

You need to install WordPress plugins to advance functions to your WordPress website. The more you need advanced features, the more plugins you need to install. There is a common query, do plugins slow down WordPress? It’s true that when you install too many plugins on your website, your site tends to become slow.
The real challenge is how to find which plugin is slowing WordPress down. Otherwise, your site will suffer, and so will your website performance.
What is the solution? Well, don’t worry. We have prepared a guide to show you the steps to find the plugins slowing down your WordPress website.

Here we go.
How to Find Which Plugin is Slowing WordPress Down
So, we will go over the steps to find out which plugins are slowing down your website,
Step 1: First, Run a Speed Test
You will find several free online speed-testing tools for this step. However, when you do your first speed test, you must note which tool you use. Moreover, many of these testers should give the same results; you don’t want to risk speed tests being inconsistently handled or providing you with different data points each time.
For this example, when you use Pingdom, it can assist you as a WordPress performance test plugin.

After running your website through the tool, you will receive a full results page. While there were suggestions on problem areas listed, You want to focus on the load time.
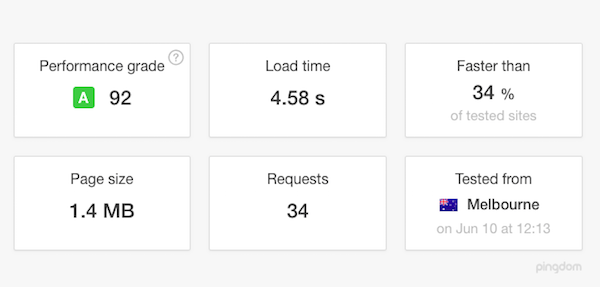
As you can see, your site isn’t speedy. In fact, if we’re going off what the Kissmetrics Loading Time infographic says, you can reasonably expect at least 40% of visitors to drop off of your website because if it takes more than three seconds to load then you are in trouble.
When you do this for your site, screenshot the results or write them down somewhere. That way, you can chart your site’s progress as you work to remove slow plugins and other obstacles preventing your site from loading quickly.
Step 2: Create a Copy of Your Site in a Staging Environment
Well, the following test probably won’t harm your site, so don’t conduct this test on the live site while visitors are potentially walking through it.
Because this testing involves deactivating plugins, that way you could potentially introduce security issues or break certain features that depend on those plugins to work. So be sure to do this test in a staging environment.
If you don’t have a staging site already, you need to set up one that mirrors your current website. You need to do everything from the configuration to the identical plugins. Next, you can run your test on the staging site, identify the problem plugin, and take action on the live site.
Step 3: Make a List of the Slowest WordPress Plugins
So, before you go into details of the plugins on your WordPress install, we suggest you quickly review the list of the slowest WordPress plugins.
You may have found the guilty party if or when your WordPress site currently uses any of these. However, that is a long shot. That’s not always going to be the case, as others could be affecting performance or a plugin conflict messing things up. So, before you pull the trigger and delete the culprit plugin entirely, you need to test it out. Moreover, there are other reasons behind of slow WordPress sites.
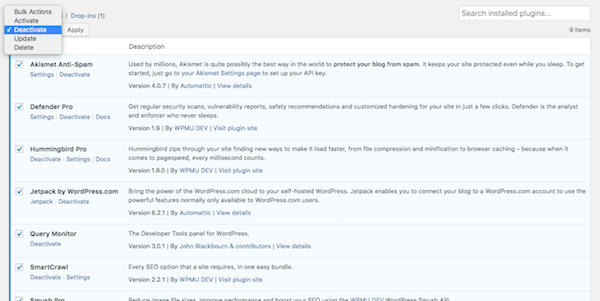
Step 4: Deactivate All Your Plugins
In the Plugins menu in WordPress, bulk-deactivate all plugins.
Open up your WordPress site. Usually, you need to do this on a new device or browser, so you don’t have to worry about a cached page skewing test results. If the loading issue is fixed, then it’s definitely one of these plugins. This can be a legitimate solution for determining which plugins are slowing down your WordPress site.
Step 5: Install Your Plugins One-by-One Again
This step is crucial. This is where you will identify which plugins or plugins are slowing down your WordPress site. You need to go through your list one by one, reactivating one at a time.
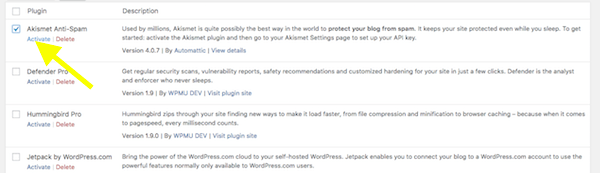
If your list includes known slowest plugins, start with that one. Otherwise, you must begin at the top of your plugins list.
Then, when the first plugin is installed, open your staging website again. What’s your tale of the loading time? Is it still as fast or close enough as your website was without any plugins activated? If so, then this plugin is OK to keep.
Some WordPress users even claim that inactive plugins can slow down your website. So, deactivate the plugin once more. You need to repeat the test with the following plugin on the list.
Also, make sure you only have one plugin active at a time at any given time. When you have discovered what is creating slower loading times on your WordPress site, it’s time to take action on the live site.
Step 6: Delete the Slowest Plugin
As you conducted this test in your staging site, you don’t need to bother with reactivating your plugins there. Instead, delete that slow plugin and go to your live WordPress site.
You need to confirm the deletion and then check your live website to ensure your performance has improved.
Step 7: Quickly Find a Faster Plugin Replacement
If a specific plugin is identified as a culprit, seek a more efficient alternative. The WordPress plugin repository is vast, and several plugins are often available that offer similar functionalities but with different impacts on site performance. Opting for a more lightweight plugin can resolve speed issues without sacrificing functionality.
However, if the feature or functionality and the plugin are essential to your WordPress site, you will need a faster replacement.
Step 8: Confirm That Loading Speed Has Improved
After making the necessary changes, run another speed test to confirm improvements in your site’s loading time. This final step is crucial to validate the effectiveness of the actions taken. Compare the before and after results to ensure that the changes have positively impacted site performance and resolved any issues caused by plugins.
Want to Manage Your WordPress Plugins Like a Pro? Try Eazy Plugin Manager.
FAQ
Should you use a cache plugin to speed up a website?
Absolutely, using a cache plugin is highly recommended to enhance the speed of your WordPress site. Cache plugins save the dynamically generated HTML files and serve them from the cache (like a snapshot) each time a request is made.
This significantly reduces the load on your server and decreases the website’s loading time. It’s an effective way to improve user experience and SEO, as search engines and visitors favor faster sites.
What are some free speed plugins for WordPress?
Several free speed plugins for WordPress can help optimize your site’s performance. W3 Total Cache improves SEO and user experience by increasing website performance and reducing load times through features like content delivery network (CDN) integration.
WP Super Cache generates static HTML files from your dynamic WordPress blog, reducing the processing load on each page view. Autoptimize speeds up your website by optimizing CSS, JavaScript, and images. These user-friendly plugins can make a noticeable difference in your site’s speed.
What is the average storage size of a plugin?
The average storage size for a WordPress plugin typically ranges between 1 MB to 5 MB. However, this can vary widely depending on the plugin’s functionality. More comprehensive plugins with extensive features might be more significant.
Considering the storage size is essential because more extensive plugins can impact your website’s loading speed and overall performance. Regularly auditing and removing unnecessary plugins can help maintain the optimal functionality of your WordPress site.
How do you know which elements are slowing down your website?
To identify which elements are slowing down your website, you can utilize tools like Google PageSpeed Insights or GTmetrix. These tools provide detailed insights into your website’s performance, including loading times for different elements.
They can pinpoint issues like slow-loading plugins, large images, or inefficient code. This information is invaluable for making targeted improvements, allowing you to optimize your site’s speed effectively.
How many plugins are the maximum for a website?
There isn’t a universal maximum number of plugins a WordPress site should have, but using only what’s necessary is essential. Excessive plugins can slow down your site, create security vulnerabilities, and cause conflicts and crashes.
The key is to focus on the quality and necessity of each plugin. Regularly review and assess your plugins to ensure they are essential for your site’s functionality and are well-maintained by their developers.
Conclusion
As we said, testing for slow WordPress plugins doesn’t take too long. It will take maybe half an hour or an hour of your time. You need to research some replacement plugins, and you’ll quickly have your WordPress site running at top speed again!
This is how to find which plugin is slowing WordPress down. If you follow the instructions carefully, you won’t have any problem finding the solution and improving your website’s performance.
Fingers crossed!